Want to change a shower head? Here is how
")
- Want to change a shower head? Here is how
- Introduction – How to change a showerhead
- What to Consider Before you change a shower head
- Recommended Supplies & Tools
- Step 1: remove the old Shower Head
- Step 2: installing the new shower head
- Step 3: Test Your New Shower Head
- Final Thoughts – Change a shower head
- FAQ – How to change a shower head
Introduction – How to change a showerhead
If your shower isn’t delivering the experience you’d like— maybe its time to learn how to change a shower head, whether it’s due to a low-quality shower head in your rental or a lack of flexibility for your needs—there’s an easy fix, change your shower head for a new one, like a versatile handheld sprayer. Want to know how to choose a new shower head? Check out our guide “How to Choose a new shower head in 3 Easy Steps | Free Guide”
Why consider installing a new shower head? If you’re in a rental, the default shower head might be a basic, low-quality model that provides weak water pressure or uneven spray, making your daily shower less enjoyable. Or perhaps you’d prefer a handheld sprayer for added convenience. A handheld option lets you direct water exactly where you need it, which is especially useful for rinsing hard-to-reach spots, cleaning the shower stall, or bathing kids or pets in the tub. It’s also a game-changer for anyone with mobility challenges, as it allows for easier showering while seated.
Shower heads come in a variety of styles, finishes, and price ranges, but they typically include a few key components: the shower head itself, a mount to secure it, and, for handheld models, a hose to connect to your plumbing. The best part? Changing a shower head is a quick and simple upgrade—most can be installed in just 10 to 20 minutes with minimal tools, even if you’ve never tackled a plumbing project before. For a small investment of $10 to $50, you can transform your shower into a more functional and enjoyable space.
What to Consider Before you change a shower head
- Size and Fit: Ensure the shower head fits by measuring the space from its base to the ceiling, as handheld models vary in length and mounting style.
- Shower Arm Angle and Features: Check the shower arm’s angle to choose a secure mount, and select features like spray settings, dual heads, or extras like LED lighting that match your preferences.
- Water Pressure Compatibility: Confirm your home’s water pressure matches the shower head’s requirements, as some models need higher pressure to function optimally make sure you check the flow rate before installing a new shower head.
- Installation Requirements: Verify if the shower head requires tools or additional parts like a new shower arm, ensuring you’re prepared for the installation process.
- Finish and Durability: Choose a finish that complements your bathroom decor and a material resistant to corrosion, like stainless steel or brass, for long-term use.

Moen 26009 Engage 2.5 GPM Handheld Showerhead
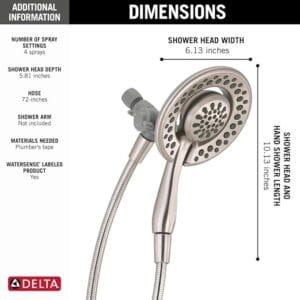
DELTA FAUCET In2ition Showerhead

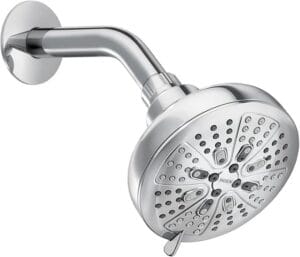
Delta Faucet Modern 3.5-inch Single-Spray Shower Head
(Links posted are affiliate sponsored Links and purchases directly support our operation. We stand behind the products we recommend)
Step 1: remove the old Shower Head
To begin changing your shower head, unscrew the grooved connection that is connecting the old shower head to the pipe protruding from the wall, using your hands or, if necessary, a wrench or pliers—wrap the pipe with a rag or electrical tape to prevent scratches if using tools. Hold the pipe steady with one hand (or a wrench) to keep it from turning inside the wall, and with your other hand, rotate the shower head’s nut counterclockwise until it detaches lefty loosey!, catching the old head to avoid dropping it; if there’s leftover Teflon tape on the pipe threads from the previous installation, peel it off and clean the threads with a damp rag and some cleaner.

Step 2: installing the new shower head
Before installing a new shower head, review the manufacturer’s instructions and installation diagram to confirm you have all parts and understand their assembly order. Start by attaching the shower head’s connector and hanging bracket to the wall pipe—check if a filter screen or rubber washer is needed inside the nut, or wrap the pipe threads with Teflon tape (clockwise, 2-3 times) for a watertight seal if no washer is included; hold the pipe steady with one hand and thread the connector’s nut onto the pipe by turning it clockwise until tight, aligning the bracket vertically as needed.
For handheld models, ensure the hose connections have rubber washers or apply Teflon tape if required, then attach one end of the hose to the connector and the other to the handheld shower head, tightening both securely—most modern shower heads don’t need tools, but you can use a rag and pliers for extra grip if necessary.

Step 3: Test Your New Shower Head
After installing the shower head, test its functionality to ensure everything works and there are no leaks. Hang the shower head on its bracket to confirm it stays in place, adjusting the angle if it has a movable ball socket by loosening the ring (counterclockwise), aiming the head, and tightening the ring (clockwise) to lock it.
Turn on the water to check the flow, cycling through all settings if your shower head has multiple options like massage or mist, and inspect all connections for leaks—tighten any dripping fittings carefully until the water stops, ensuring your new shower head is ready for use, great job you’ve just learnt how to install a shower head

installing a new shower head – Boomtips
- Prep for a Smooth Removal: Before unscrewing the old shower head, lay a towel in the shower to catch any small parts, and have a rag or electrical tape ready to wrap the pipe to avoid scratches if using pliers or a wrench.
- Ensure a Leak-Free Install: When installing the new shower head, always check for a rubber washer in the nut or apply 2-3 layers of Teflon tape clockwise around the pipe threads to create a watertight seal and prevent leaks.
- Test Before Tightening Fully: After loosely attaching the new shower head, turn on the water briefly to check the bracket’s alignment and adjust as needed before fully tightening the nut to avoid repositioning later.
- Double-Check Hose Connections: For handheld shower heads, ensure both ends of the hose are securely tightened with rubber washers in place, and run water through all settings to confirm there are no drips or loose fittings.
Final Thoughts – Change a shower head
Installing a new shower head, whether regular or handheld, is a straightforward and rewarding upgrade that can significantly enhance your daily shower experience for a modest cost of $10 to $50 and just 10 to 20 minutes of your time.
With no special skills required, this easy DIY project allows you to customize your shower to your needs—whether you’re improving water pressure in a rental, adding a handheld sprayer for convenience, or incorporating luxury features like massage jets or LED lighting. By carefully selecting a shower head that fits your space and preferences, and following the simple installation steps, you’ll enjoy a more functional and enjoyable bathing routine that can even add value to your home or help maximize a move-out deposit refund.
FAQ – How to change a shower head
What tools do I need to change a shower head?
You’ll typically need an adjustable wrench or channel-lock pliers, a cloth or rag to protect the showerhead’s finish, and possibly some plumber’s tape (Teflon tape). Some showerheads can be removed by hand, so check your model first. Having a small brush or vinegar handy can help clean any buildup on the shower arm threads.
How do I remove an old shower head?

Turn off the water supply to the shower to avoid any leaks, if possible, though it’s often not necessary for this task. Grip the showerhead or the connector nut with an adjustable wrench, using a cloth to prevent scratching. Turn counterclockwise to loosen and unscrew it from the shower arm. If it’s stuck, soak the connection in vinegar to loosen mineral deposits, then try again.
How do I install a new shower head?
Clean the threads of the shower arm with a brush or cloth to remove any debris or old plumber’s tape. Wrap the shower arm threads with 2-3 layers of plumber’s tape in a clockwise direction to ensure a tight seal. Screw the new showerhead onto the shower arm by hand, turning clockwise until snug. Use a wrench with a cloth for a final gentle tighten, but don’t overtighten to avoid damaging the threads or showerhead.
Why is my new shower head leaking after installation?

A leak is often caused by loose connections or improperly applied plumber’s tape. Ensure the showerhead is securely tightened to the shower arm. If it still leaks, unscrew it and check the plumber’s tape—reapply it if it’s damaged or uneven, wrapping it tightly in a clockwise direction. Also, check for a washer or rubber gasket inside the showerhead connection; if it’s missing or worn, replace it with one provided in the showerhead packaging.
How To Install Curtain Rods | Learn To Hang Curtains | Easy Free Guide
How To change a light bulb in 3 easy steps | Free Guide – RepairBoom
How to unclog a drain in 4 easy steps | Free Guide – RepairBoom